Grooved 6 Board Burr #2 – Junichi Yananose

Here we go again! This time with Grooved 6 Board Burr #2

This one is supposed to be much easier than the first. We shall see!

It’s a beaut Clark, a beaut!

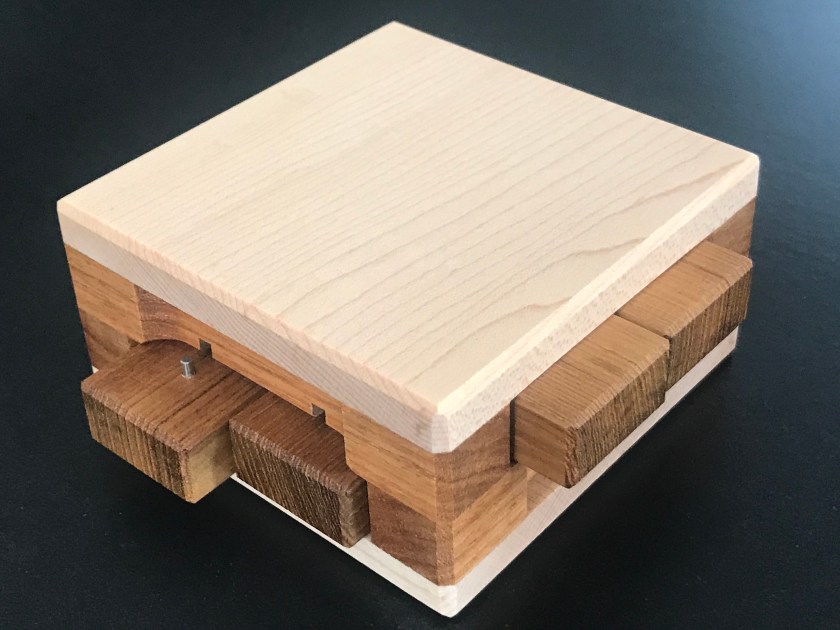
Before we begin, I have to talk about the beauty of this thing. It’s incredible. Constructed of Bubinga and European Beech, it is much heavier than the first and in my opinion, is even better looking. The Bubinga has a wonderful wood grain throughout and it is nicely contrasted by the lighter, yellowish Beech. Also of note is the lack of visible grooves and pins. They are still in there, you just can’t see them without moving pieces around. I love this concept – the idea of creating a simple looking puzzle that hides all the intricacies internally that are only revealed through manipulation. There’s no way to plan ahead with this puzzle, you have to start solving in order to learn how to solve it. Very cool.

The description includes “..but we believe that many burr puzzle lovers can assemble the puzzle without any clue.” Challenge accepted! With the previous puzzle, I utilized stickers and photos for reassembly. This time, I’m going to give it a shot without those aids. Wish me luck!

As with the first puzzle in the series, this one is a joy to hold and manipulate. The pieces slide easily and the heavy nature of the wood makes for solid sounding “thunks” and “claps” as the pieces are pushed and pulled. 

Wow. First impressions – I’m stunned. This puzzle isn’t what I expected. There seem to be numerous ‘half-moves’ involved and the puzzle quickly becomes a little loosey goosey and that makes it hard to keep track of what the heck I’m doing. I like to backtrack often in order to keep an idea of where I’m at with a puzzle, but I’m having a hard time doing that here, so I have just pushed forward.

I soon found a move where I thought that pieces would come out, but at the last second, they stopped and I wasn’t able to remove them after all. Super fun and exciting, but slightly intimidating. 

After this, I once again decided to return the puzzle to the original state. The next day, I set about again and could only get about 6 or so moves in. I couldn’t seem to find the move that I completed the previous day. I became rather frustrated as I knew this move was so close, but I just couldn’t unlock it! Gahh!

Well, eventually I found it and it was again thrilling to see the pieces slide all the way to the edge without coming out. What the heck was holding it together? I reworked this move a few times and eventually discovered what I had been doing wrong. Now that I was familiar with these moves, I decided to press on again.

Pieces sliding way out! Close, but no cigar!

This led to more interesting moves – there are a number of times with this puzzle where a series of micro-moves are required. It is great fun, but hard for my brain to comprehend. At last I came to a configuration that once again felt like pieces could fall out and sure enough a piece dropped out the bottom while I was holding it. Had I solved it? Was this the intended solution?

It’s hard to say, by my count, I was only about 19 moves in and Juno’s description says 25 to get the first piece out. Hmm. So, I put the piece back in to check for more moves. Sure enough, I found a couple more of those micro-moves that allowed me to remove the first piece in a much more elegant manner. Ta Da! 

Fun, Fun Fun! What a very cool puzzle. The inner workings of this puzzle are a wonder to behold! And to my surprise, 2 of the pieces were complete rings, with no grooves or pins at all! Juno has done it again!

Look at those amazing boards!

Now, the question remains, Can I reassemble this thing without relying on my notes or photographs? I’m going to come back in a day to let the memory of the positioning and movement fade a bit and see if I can do it!

Ok, let’s see if we can do this. How hard can it be? Looking at the pieces, it is fairly obvious as to how it should go together. There’s only 2 boards that have pins. And there’s also only 2 boards that have grooves. It’s also fairly obvious which pin board goes with which groove board, so now all I have to do is actually assemble the shape.

So far, assembly isn’t going too well. I am quite sure I know which pieces fit where, but at present, they won’t go back together. I’m going to keep at it for an hour or so and see if I can make some progress, but so far, no luck. 

Holy crap I did it! With enough tinkering and guesswork, I finally figured out the arrangement necessary to put it back together. I got some strange looks from my family (and dog) as I was shouting “Yes! YES! YEEESSSS!” but it was certainly worth it. Really, it wasn’t that difficult, I already knew which piece had to go together and I was pretty sure about their orientation, it was just a matter of figuring out how to get them together. In truth, the pins and channels guided the way. I extended the board pairs to their maximum – essentially putting the pins at the end of their grooves and then tried to assemble the thing. Pretty quickly I knew I was on the right track and in fact the assembly went together rather quickly from this point. 

Overall, another fantastic puzzle. Definitely way easier than #1 and I’d say this puzzle is even approachable to folks who are new to puzzles.

Two down, 4 to go!

Grooved 6 Board Burr #1 – Junichi Yananose

The time is here, the mission’s clear. Today I will attempt to solve Juno’s amazing Grooved 6 Board Burr #1.

I purchased this particular puzzle way back in 2018 and have yet to solve it. I’ve toyed with it a few times, but never really put in a good effort. As Juno has continued to release more Grooved 6 Board Burr’s (6 released so far) I thought it was time to finally tackle this one. Assuming things go well, I’m going to move on and try to solve them all (yes, I’ve continued to buy them as they are released) and they’ve all remained on the shelf taunting me. Well, no more! 

Burr #1 is a gorgeous piece of work. It’s made from American Cherry wood with reinforced corners made of Jarrah. The action is smooth, it’s enjoyable to hold and it’s really a wonder to behold – as are all of Juno’s puzzles.

It’s hard to imagine that this simple looking board burr contains so many possible configurations

The description of this one is intimidating. 22 moves to take out the first piece and 4246 assembly options. The big difficulty lies in the grooves and pins. There are grooves routed into many of the boards and correlating pins that travel along the grooves while moving the pieces. This groove and pin system greatly restricts the movement and adds extreme difficulty – especially in assembly. I’m not even going to attempt a blind assembly, my plan is to track all the movements and map things out so that I can reassemble after I’m done.

Let’s get started. 

The puzzle is quite fun to play with. There are two moveable boards to start with, but one of these options quickly hits a dead end. The second option quickly forks to more options and once again one path leads to dead ends, while the other seems to open up more opportunities. Things really get interesting here as the boards slide around and different moves open up even further paths and though it seems like a piece might come out at any minute, I know better than to get too optimistic. These darn grooves and pins prevent the boards from sliding all the way out. 

Seven moves in and I’m stuck. I felt like I was on the correct path, but this feels like a dead end. I must have missed a move somewhere. Time to backup.

Ok, now twelve moves in and stuck again. This is getting quite hard to keep track of. Instead of just one board moving at a time, it is now groups of 2 or three that seem to want to move at the same time. It’s difficult to tell whether these are individual moves or not. Sometimes I think I found a new path only to discover that all I’m doing is reversing the previous move. Things are getting tricky, but I must press on.

Jeez. 15 moves in and I’m sort of back at the beginning – except I’m not. There’s one piece that is now out of place. I’m not sure if this is the correct path or if I’m just circling round and round doing the same moves.

It has just dawned on me that I have no idea what I’m doing. There are pins and grooves and I can see exit points in the grooves, but I’m not really trying to put a specific piece in a specific place, rather, I’m just blindly going down every path possible, hoping that I’ll eventually find the solution. I really don’t know any other way to solve this beast. But I’m currently about 18 moves in and so the end should be near. However, I could be way off on the 18 move thing. Doubt is creeping in as I hit another dead end and have to back up a couple of moves and try a different path.

Not easy to keep track of the moves at this point. Am I progressing forward or just circling around and around?

Aaaand. I need a break. By my count, I’ve completed 32 moves and haven’t removed a piece, so clearly I’m repeating moves and circling around. I’m having a hard time keeping track of what moves take me forward and what moves return me to a previous state. This thing is not easy. There seem to be countless dead ends and the pieces have to be positioned perfectly before moving forward. The puzzle allows you to move forward, but if the pins aren’t in the correct position it just leads to a dead end. This is very tricky indeed and after a solid hour of concentrated focus, I’m going to rest on it and give it another go tomorrow.

Next day and I’m back at it. I’ve taken the puzzle back to the start and am working my way back through the sequence very slowly and carefully, looking for every possible path forward. I’ve clearly missed something along the way and I intend to find it. I also re-read Kevin’s blog post about this puzzle where he specifically says “The true pathway was quite an early divergence from that initial path.” This helpful hint also influenced me to start over and look more carefully.

Ouch. This puzzle has spanked me again! Another fruitless half hour gone as I get more confused. I really thought I’d be able to solve this a little quicker, but I guess not.

And after another hour or so of tinkering, I finally found the move! Wow. I’ve done it. The puzzle has been disassembled. Whew, that was amazing! This truly is a devilish puzzle. I’m amazed at how many deep dead ends there are. Most puzzles that I’ve worked on have much shallower dead ends – it quickly becomes obvious that you are down the wrong path. But, not this puzzle. There are still multiple forks available within the dead end that causes you to keep tinkering, to keep believing that you are right, when in reality, you are dead wrong and the only way to find the real solution is to backtrack 10 moves almost all the way to the beginning. Wow. Just wow.

Yay! I’ve disassembled the puzzle. What an amazing feeling!

I don’t know if I stand any chance of putting this back together. I took dozens of photographs to attempt to keep track of those final moves, but I’m feeling doubtful. Even after the first piece was removed, it still took me a good amount of time to figure out the next piece and it still didn’t get much easier. The final few pieces were stubbornly difficult to remove as well.

In the end, I managed to get it back together without using burr tools. To me, that’s a success. I may have used photos and my written notes, but ultimately, it went back together. It was tricky as there were some moves that I hadn’t tracked very well, but ultimately, I had enough clues to make it work. Whew. I’m exhausted! The bolt of adrenaline from solving the puzzle coupled with the extreme focus required to hold everything together and the mental gymnastics to decipher my notes has left me ready for a nap. 

Notes on the page, colored stickers and coffee are essential ingredients for a difficult solve.
Colored stickers make it easier to identify moves and keep track of what’s what.

Overall, I’m beyond thrilled with this puzzle. It may have taken me 3 years to get it done, but it was well worth it and I will display this one proudly on the shelf. This is truly a masterpiece. Now the only question that remains: Will the other 5 grooved board burrs live up to this one?

RAYA BOX No. 1 – Yavuz Demirhan

Today, I have a wonderful packing puzzle from Yavuz Demirhan. It’s the first puzzle I’ve worked on from Yavuz, but it certainly won’t be the last. (EDIT: I’m wrong – one of my favorites, Octo Cube was designed by Yavuz – you can read that post here) Raya Box No. 1 is the first in a series of 7 Raya packing puzzles available at his Etsy Store HERE.

These puzzles come from Turkey, so be prepared to wait a while if you order from his store. I placed an order on February 1 and just received the box yesterday – so it took a little over a month to arrive. It’s worth the wait though. These puzzles are inexpensive, but still well made and very fun to solve. I also ordered No. 2 and No. 7, though I have yet to even unbox those.

Pack it up, pack it in.

This packing puzzle consists of a rectangular box with restricted openings. There are 6 pieces that must be placed inside the box – 3 “L” shaped pieces and 3 square pieces. The puzzle also comes with a storage bag. I really like that the bag and the box both have the puzzle name on them. This greatly helps my organization. As my collection grows, it becomes difficult to remember the names of the puzzles and the designers – I usually end up searching my emails for receipts or the archives of various puzzle websites to re-discover the name and/or objective of puzzles that I have neglected or forgotten about.

It took me about an hour to solve this one, and I usually struggle with packing puzzles, but for some reason, this one felt very approachable.

I began by trying to assemble the pieces into the required shape outside the box. Most times, with these packing puzzles, I can flip the box over and assemble on the bottom. The edges of the box keep the pieces constrained to the correct dimensions and I find this easier than assembling on a table.

After a bit of struggle, I managed to find a configuration that was the right size and shape. Yay, I thought. Now, I just had to put the pieces into the box. I tried a few times, but it quickly became apparent that the pieces would not fit in this configuration. That darn restricted plexiglass opening wouldn’t allow the pieces to go in as I wanted. I tried flipping the whole shape over to see if they would go in that way. No luck. I persisted for a while, but eventually, I had to give up and go to bed.

One of the many configurations available.

The next day, I tried again. This time, I decided to see if there were any more ways to make the required shape. Ah ha! I found another way to make the cube and once again tried to fit the pieces into the box. And once again I failed. But, I felt I was on to something. The restricted opening makes it clear that the square piece will have to go in last – there just isn’t room for the final piece to be an “L” shaped block.

Back to the drawing board, I took the last configuration and altered it slightly. I could envision how it was going to work if I could just get the first few pieces in correctly. Sure enough I found a way and YES, it worked! That was pretty cool.

No spoilers here. Blurred for your safety.

I’d call this one a moderately difficult packing puzzle. It’s not easy by any means, but it isn’t super tricky either. I think a novice puzzler with enough time would be able to figure it out and an experienced packer could get it done in under an hour – maybe quicker if they really thought about it instead of just trial and error.

If you haven’t already, please check out Yavuz’s Etsy page. As I type this, there are still a number of puzzles available.

TwisTIC – Andrew Crowell

It’s been a while since I worked a TIC puzzle and I managed to grab a copy of this puzzle from Wood Wonders before they sold out. I’m super excited for this one, let’s see what’s in the box!

I’ve read that this puzzle has tons of rotations and is quite difficult. I can’t wait to check it out.

Well, I’ve managed to get it out of the packaging and I’ve separated the pieces. It took an embarrassingly long time to just get it disassembled from how it came packaged! This one is gonna be challenging..

Jeez, this puzzle is something else! There are two particular pieces that I’m playing with and I can sort of “sneak” them together. I don’t know if it’s part of the solution, but it’s really fun to play with – just have to be careful I don’t break anything!

uhh, yeah, that’s supposed to be a cube, just need to re-arrange a piece or two.

Ok wow. I think I just made a major breakthrough. I kept exploring the above move, when the 2 pieces locked tougher into a promising configuration. I then picked up the remaining pieces to see if any would fit – and it looked like they would! The problem was, I was going to have to interlink these 3 pieces somehow and then navigate them to the proper positions.

And, boom! with my daughter in my lap, I manage to get those 3 pieces together and in the right place. It took several tries as there’s not a lot of room to maneuver, but I eventually found the configuration that allowed me to move the pieces into place and then the final 2 pieces popped right in!

Yet another TIC to add to the collection. This was one of the more unique ones I’ve seen.

Ah, I love the TIC puzzles. There’s something about them that makes me happy. Most likely because I seem to be able to solve them fairly easily. This one went together way quicker than expected, but I’m still super happy to own it and add it to my growing TIC collection.

It’s definitely a unique TIC. I haven’t seen rotations and movements quite like this before. There is a very tricky sequence to get the pieces oriented and in the right position.

Part II

Well, I sure was feeling a bit smug after finding the solution so quickly. And I could have ended this blog post at that – but the story didn’t end there.

I wanted to take the puzzle apart to get some photos, so I began to disassemble. The first two piece are trivial to remove, but then things get difficult. So difficult, in fact, that I failed to disassemble the puzzle! I literally tried for over an hour just to take things apart and instead, all I managed was to create a tangled mess where I had lost track of what pieces were where and couldn’t progress forward, nor could I move back to the solution.

I’ve created a mess of things and can’t seem to move forward or backward.

I grew a bit aggravated by this failure. After all, I had solved it so easily, and furthermore, I knew exactly what I needed to do! How was it possible that I couldn’t take these pieces apart?

Eventually I found my way back to the correct (solved) position. I felt lucky to have finally made it back. I was scared and intimidated to try again. And although I hate to leave it at that, I need some recovery time before I can go in for a second attempt at disassembly. Suffice is to say that I’ve been humbled by this puzzle, which in turn makes it a highly recommended puzzle. It’s quite an exciting puzzle and unlike any TIC I have seen before.

Sloot 3 – Alfons Eyckmans

Ah, Sloot 3, a November 2019 release from Cubicdissection.com that didn’t seem to garner much attention. Perhaps this puzzle was overshadowed by many of the other amazing puzzles released last November – Split Maze Burr, Escalating Box, Small Box #3 & #4 come to mind.

I’m guilty of overlooking this one as well. Sometimes I order too many puzzles, can’t get to them all and so they end up in my “box of unsolved” puzzles. This one suffered such a fate. While my attention was on the small box series, this one collected dust and went forgotten. But, today is a new day and I’m feeling motivated to knock it out.

Look at that Purdy, Purdy puzzle.

Sloot 3 is a very cool puzzle. It looks like a typical 6 piece board burr puzzle, but closer inspection reveals hidden complexities. The edges of the burr pieces have these outer slots into which tabs on the inner side of the boards fit. This restricts movement and adds an extra element that must be considered when disassembling this puzzle.

Maybe the coolest part of all this is that these outer slots are NOT simply routed into the wood. Eric has crafted these channels out of solid wood. It’s a subtle detail, but a very impressive one that really makes this puzzle stand out. It’s exactly these types of details that separates Cubic Dissection puzzles from the pack. The extra attention surely cost more time and material, but the result is worth it and why I choose to spend the extra money.

Attempt at a detail shot of the tabs and slots

So, I’ve been playing with this puzzle for the past couple of days. I think I am close to getting the first piece out, but I am currently stuck at a dead end. It’s a fun puzzle to manipulate. The channels and tabs prevent obvious movements thus a more calculated approach is required. The channels also keep this puzzle locked in tight. There’s no wiggle room.

A typical configuration during the solve. I was stuck in this area for many hours before I found “the move”

After several hours, I eventually escaped the repeating dead-end maze-loop and found an excellent hidden move. Bah! how did I miss that! What a cool puzzle! This little move opened up a whole bunch of other options and now I know that I’m getting close.

After a bit more manipulation I see how I can remove the first piece. Yes! fantastic! I remove the first piece and it’s not over yet. The puzzle doesn’t just fall apart. There’s still some calculated moves required to get out piece #2. But, it’s not too difficult and soon enough I have the whole puzzle apart! Awesomeness. Man it feels good to solve a puzzle!

Puzzle Solved! Yay that was fun!

Ok, the assembly. Truth be told, I took some photos of the final moves, so I used those as a guide to put things back together. I don’t know if I have the ability to do the assembly without help. It certainly would have taken a long, long time, and, well, I have more puzzles to do, so there it is.

Another shot of the disassembled puzzle. Look at all those tabs!

Overall a very fun puzzle that I found to be rather approachable despite it’s difficulty rating (16.6.4) Highly recommended if you can find a copy.

Pinned Framed Burr S – Junichi Yananose

Woot! Another Juno puzzle from Pluredro.com! I don’t buy a lot of puzzles from Pluredro, but this one looked unique, so I couldn’t resist.

This is yet another puzzle that I’ve been ignoring for too long. Released back in February 2020, I purchased this puzzle, along with the “L” version. Both have been sitting in a box in the basement awaiting my attention. Well, I’ve been on a puzzling binge lately, so let’s get started!

The construction of this puzzle is very nice. The framed box is super solid and the burr sticks feel substantial. If anything, this puzzle has a rather plain appearance. It doesn’t scream “pick me up!” like other puzzles do. But looks can be deceiving and the real allure of this puzzle is hidden away, out of sight.

There is a nice audible click and clack as I play with the puzzle which is super pleasing. It’s a borderline fidget toy as you can just sit there and watch tv while pleasantly click and clacking away. Every once in a while you find a new move and the piece push further into the frame which is very satisfying and encourages continued exploration.

The objective of this puzzle is to remove the 4 burr sticks. The burr sticks move by pushing on them, but hidden within the puzzle are an unknown number of pins and channels which must be negotiated in order to remove the pieces. The fact that these elements are hidden really adds to the fun and difficulty of this puzzle.

Pieces move in, pieces move out. Am I making progress? I don’t know.

I didn’t know how to approach this puzzle, so I just played with it. I thought about trying to map out the path that the pins follow, but the problem with that is that I can’t see the pins, don’t know how many there are or where they are located. So, mapping seems out of the question.

In the end, I didn’t even try to keep track of things, I just set my mind to removing the burr sticks and proceeded with a semi-reckless determination to just make it happen. And after many hours, I succeeded!

I was sitting on the couch pushing the burr pieces around (most of the time, I didn’t even focus on what I was doing) and suddenly a piece landed in my lap! Whelp, guess I did it!

Pieces removed. Very interesting arrangement of pins and channels for this puzzle!

Removing the rest of the pieces was a little challenging as it turns out some of the pins are offset, so they can only be removed after the first piece comes out. There’s definitely some hidden trickery happening here and it’s very, very interesting to handle these burr sticks and see how they interact with each other inside the frame.

After taking some photos and admiring the craftsmanship, I set to put it back together. Oh boy! I was expecting things to go relatively smoothly, but turns out re-assembly is quite difficult indeed! My first attempt failed. I think I put things together wrong in a way that would never be able to be solved. Some of the pieces moved around and I thought I was putting it back together, but there was one piece that didn’t seem to “engage” the other pieces, so I eventually had to back track, remove the pieces again and start assembly over.

I think I went through this process 3-4 times, spending hours trying to reassemble the puzzle with piece in the wrong place. Eventually, I got fed up with things, pulled all the pieces out and decided I needed to be more systematic. I examined the pieces, how they interact and tried to really understand things to help me better assemble.

I discovered that there were a couple of different ways to insert the burr stick that fell out first. One of the ways lead to dead ends, the other lead to the solution. It was true, I had been doing it wrong, so I tried the second option and things started to go together better. It still took me a couple of hours to get the puzzle back together though!

Wow! what a challenge. I really thought this would be more straightforward and easy, but it proved to be a worthy adversary. I’m quite scared to try the “L” version, as it looks way more complicated, which is scary indeed. Thanks Juno! I enjoyed this one.

PUMPKIN 1 – Osanori Yamamoto

Ya know, when Covid first hit I was kind of excited because I thought I would get to puzzle all the time. I figured that I’d be home a lot more and would have lots of down time and that I’d be knocking out puzzles and blog posts like a machine. Oh how wrong I was.

Turns out, I wasn’t the only one stuck in the house. My wife and kids were along for the ride as well which meant we have all been crammed into this house for a better part of 7 months. The result is that I’ve had very little personal time and thus very little puzzling time. I’m still buying them at an alarming rate, but haven’t been solving that many.

The other day, I said “enough is enough, I need to solve some of these things before I’m buried in them.”

So, I picked up Pumpkin 1, designed by Osanori Yamamoto and determined that I was going to solve it no matter what.

This particular puzzle was crafted by Pelikan Puzzles and is nicely built and a pleasure to play with. It’s made of Pear / Bubingo wood and there is a very nice contrast between the orange pieces and the tan box. It seems like Pelikan has been focusing more on these “more affordable” puzzles lately and I’m that’s fine by me. Though I hope that they continue to release new “premium” puzzles as well.

This puzzle starts off simple enough. There are 3 pieces and one box and all you have to do is get those pieces into the box so that the entryway is completely filled up. It sounds easy and looks easy, but I’ve worked on these Yamamoto packing puzzles before, so I know that I’m in for a struggle.

Only 3 pieces. It should be easy right?

My first attempts involved randomly sticking pieces into the box to see if I could “get lucky” and find a solution randomly. This method lasted a few hours over the course of an afternoon and not only did I fail to make progress, but I was having trouble remembering what configuration I had tried and what I had not, so inevitably, I repeated the same failed assembly over and over.

I eventually gave up on that idea and opted for a more systematic approach. I’d start by assembling the pieces outside the box in a 3×3 cube. Then I’d search that cube for any 2×2 feature that would “fill the gap” of the box. Once I had a 3×3 structure built that satisfied my requirements, I’d then try to find a sequence to get those pieces into the box in that same configuration.

3×3 overall cube with a 2×2 section. Next step is to see if this will fit into the box.

Over and over I tried again and again and each time I failed. There are actually a whole lot of configurations that would theoretically “work” if only they’d fit into that box. But, the more I worked with the puzzle, the more I came to understand the limitations of the box. That angled top, the bottom lip, the inability for pieces to rotate inside the box – all these things existed to thwart my attempts.

Another day passed and I became even more systematic. The problem I was having is that I would come up with a 3×3 cube that I liked and whilst trying to then insert the pieces, I would lose track of the initial setup. This was frustrating as it is possible that I had the right solution, but got lost along the way and would eventually “reset” before trying all the options.

I began taking pictures to better keep track of the different configuration and I also began employing temporary stickers to keep track of the pieces. This helped, but did not result in a solution.

Another 3×3 cube, this time I’m using stickers to keep track of the pieces. Red, Blue and Yellow should be visible when it’s inside the case.

I then abandoned this method and started really thinking logically about this puzzle. Which piece goes in last? What is the likely configuration of these other pieces? How can I use the shape of the pieces and the shape of the box together? Instead of trying every option I could come up with, I decided to try to narrow things down and focus on what makes the most sense.

And just like that, I found the solution.

Solved! Yay!!! I did it!

The genius in this design is the fact that the packed 3×3 cube has lots of missing voxels. This allows for unique pieces that can be fit together in countless arrangements. Had the pieces made a perfect 3×3 cube, there would be no mystery, there would be only 1 obvious arrangement and that would be no fun.

Overall, an excellent packing puzzle that provided the right amount of challenge. I stayed interested and determined and was rewarded within a few days time with the solution. Highly recommended if you enjoy this type of puzzle!

Surround – Kohno Ichiro

I’m back in the puzzling groove and this week, I’ve got Surround designed by Kohno Ichiro and masterfully crafted by Eric Fuller over at Cubicdissection.

There have been a number of Ichiro puzzles released by CD recently, including Three Cubes, Four Cubes, and most recently Five Cubes and Surround. I’ve really enjoyed these puzzles. They are relatively easy, but also deceptively tricky. They are great puzzles for all skill levels and very satisfying to complete. The use of small, strong magnets really adds to the experience.

Ok, I’m excited to work on this one, so let’s get started. There are apparently 3 solutions to this puzzle – 2 that use the magnets and one that does not. The completed structure needs to be self-supporting.

There are 6 pieces and a cube. 3 of the pieces are mirrored which would lead be to believe that this is going to be a symmetrical solution, but I’ve been wrong many times before on things like this, so let’s see what happens.

Another beautiful puzzle from Cubicdissection!

Ok, well my first attempt was a total failure. I figured, I’d start with the cube and just add the pieces to the perimeter to surround it, but that did not work at all. The magnets didn’t cooperate that the resulting shape certainly did not surround the cube. Ok cool, I didn’t want this to be easy. Let’s give it another 15 minutes and see what’s up.

Ok, interesting. I believe that I have found one of the solutions – one that utilizes the magnets. It seems that my initial interpretation of “surrounding” the cube was incorrectly understood as “completely cover” the cube. And thus, I was searching for a solution that didn’t exist. Once I let go of that idea, and simply tried to surround the cube, I found a solution quite quickly. The cube is indeed surrounded and contained and the puzzle is self-supporting. Yay! Solution #1 is in the bank! And it is quite a cool looking construct that has formed. The Padauk and Tamerindo make for a beautiful contrast on the completed piece.

Warning: Spoiler Image Solution #1

Now, onward to see if I can find solution #2.

Well, it too me another 30 minutes or so, but I’ve successfully found solution 2. Interestingly, it is very similar to the first solution, if I hadn’t taken a picture of the first solution, I’m not sure that I would have know that the configuration was different. But, sure enough, it is different. The center cube is a little less covered with this solution, but it is still very pleasing to handle and display.

Warning: Spoiler Image Solution #2

Overall, a very fun and pleasing puzzle to work on and solve.

After sitting on this puzzle for another day, I decided to try to find the third solution. This one required covering the cube completely, but didn’t use the magnets. After about 10 minutes of fiddling, I was able to find the solution – it didn’t look pretty, but the cube was entirely covered.

So there you have it. 3 solution to one puzzle. I really enjoyed it and am happy to have it in my collection. The only question that remains is: Will we see another incarnation of this puzzle? A 7 or 8 piece configuration? I’m not sure that there is much left – and in fact, since I own, the 3,4,5 piece and surround, I could play with combining those to see if anything interesting happens.

Spheres – Stephan Baumegger

Spheres arrive yesterday and I’m just now sitting down to play with it. My first impression is – “Wow!” This puzzle is beautiful. The box is exquisite, the lid fits nice and tight, the pieces are really nice looking and I especially like the choice of “spheres” used. I’m so glad Stephan chose to go with these natural stone spheres instead of silver ball bearings. They add a nice contrast, yet still fit perfectly into the overall color scheme. This puzzle is definitely a show stopper.

Witness the beautiful woodwork on this puzzle.

The object of the puzzle is to cram everything inside and shut the lid. I suppose there will be little cramming and mostly planning, arranging and sliding, but either way, it’s all gotta fit.

Well, enough gibber gabber, I’m ready to start solving this thing.

A few minutes pass and I’ve gotten a little more familiar with the pieces. There are 3 sets of 2 pieces that mirror each other and 3 balls. The thing that is throwing me off is the smaller ball. It would seem that this puzzle will require a symmetrical pack, but then, where does that leave the 3rd ball? I’ll have to try some non-symmetrical arrangements as well to see if that’s the key.

Cram everything in and you win!

About 15 minutes later and I’m not any closer to the solution. The pieces are fun to play with and there seem to be an endless amount of arrangements. I can easily get the 6 sticks into the box with 1 large ball, but that’s as close as I’ve come.

Ok, another few minutes and I’m starting to realize that this is not going to be sloppy pack. I don’t know why it would be, but there’s something about including these “spheres” that makes me feel at liberty to let them roll around a bit, thus resulting in a sloppy pack. My new strategy is to pack tightly. Let there be no unfilled negative space inside the cube. If there is space, then it is wrong. Let’s see how this approach goes.

Hmm. well, for a few minutes there, I thought I was on to something – I had a nice tight pack going with 3 pieces, but then things fell apart and did not progress from there. Back to the drawing board!

Not the correct way to pack them in.

Failure again!

Bah! I thought I had it, but then looked down and saw one more stick! I got 5 sticks and 3 balls in… Does that count for anything? No? Well, ok then. Let’s have another try.

Whelp it looks like I’m going to remained stumped for this session. In total, I worked for about 45 minutes. And I have to say, so far it’s been delightful. I keen thinking that I’m on the right track only to find out that I’m not – which is great for a puzzle. This thing gives the impression that you are making progress, which keeps motivating me to try one more combination, and another and another. But, I’ve now burned my allocated time for puzzling today and must return later for another attempt.

Ok. I’m back again on another day to see what I can see. I’m quite drawn to this particular puzzle. I think its the combination of elements (sticks and spheres) that makes it interesting.

Annnnnd, I’m back in the same cycle of failure. I really thought I had it, but alas, there doesn’t seem to be any room left in this darn box for that final piece. Once again, I face the realization that I can’t leave any empty space anywhere.

Zing! I did it!

The lid closes (and the pieces are inside!)

Very, very cool and enjoyable puzzle! I was on the right track the whole time, I knew what had to be done, it was just a matter of time until I found the correct arrangement that allowed all the pieces to fit. And there is definitely something unique involved when it comes to packing spheres. Had those spheres simply been squares of wood instead, I don’t think the puzzle would have been nearly as enjoyable and I’d wager that it would have been easier to solve as well. Again there is something about those spheres that tricks the mind (my mind at least) into believing that a “sloppy pack” is going to work.

Overall, a fantastic puzzle. The box is beautiful, the pieces are fun to play with and the puzzle as a whole has a nice hefty weight to it. This may be the first puzzle I’ve ordered from Stephan, but it certainly won’t be the last!

Small Box #4 – “Paradox Box” – Eric Fuller

Well, it’s been a while since I wrote one of these blog posts. Life has been busy and I have been negligent. I haven’t stopped puzzling, I’ve just taken a little break from writing about them. Sometimes its nice to be carefree about solving puzzles and not feel obligated to wait for the perfect time where I can write down my thoughts and document the solve. Hopefully I will get back to regular posting in 2020. By the way – Happy New Year to everyone out there in puzzle land.

Another month (or two) has passed and I have another Small Box puzzle from Eric. This time I have Small Box #4 and boy, was this one fun!

The Small Box series has been wonderful. I have always shied away from puzzle boxes. They are usually expensive and once you solve them, they just become decorations on the shelf. I kind of viewed them as a novelty. Well, my admittedly naive opinion has officially changed. The small box series is what really did it for me too. The price point is far more palatable and something about the small size makes them even more approachable. These boxes are also perfect to hand to friends and family during gatherings. There is something irritating about NOT being able to open them which really makes people determined to do so.

Small Box #4 is beautiful. It is slightly larger than the other 3 boxes, clocking in at roughly 3″x2″x1.5″. It is composed of an Ash box and an Bloodwood top. The contrast of colors is eye catching and the construction, as always, is top notch perfection.

Small Box #4 has stumped me for quite some time. The description is perfect “… seems easy at first. Movement here…movement there…what you need to do is immediately apparent, but seems impossible to achieve.” This was exactly my experience. I was caught in an endless loop of the same movements. I just couldn’t figure out any alternative moves or ideas.

Back and forth, back and forth I went. And so, it sat on the shelf for many weeks. Occasionally, I’d pick it up and slide the top back and forth achieving the same nothing over and over. I was truly confounded. What was I missing? Sliding the box top to the left allows the left side to move up. Sliding the box top to the right allows the right side to move up. The problem is, you need both sides to slide up to move the bottom panel.

There had to be something else going on. And, having solved the other 3 small boxes, I knew that somewhere there was a solution. But, that solution kept eluding me. Eventually, I forgot about the puzzle and moved on.

Then, randomly one day, I picked it up again and and was struck with an idea. I tried the idea and failed, but at least I had made some sort of progress – it wasn’t physical progress, it was mental progress. I had broken through the endless loop with a new idea. This gave me motivation to carry forward.

Steadfast in my belief, I tried that same idea again, but in a different place and sure enough – Ah Ha! It worked! I sat back and marveled at yet another Eric Fuller creation. It is such an amazing rush of adrenaline to solve these things. The pain and agony of the endless loop of non-progress is always rewarded in the end when the box is opened. There must be a life-lesson here. Keep pursuing even in the difficult times as you will be rewarded in the end.

Puzzle Solved! What a rush!

What a great feeling and what a clever puzzle. This may be my favorite of the 4 small boxes released thus far. The small box series is currently sold out, but you can find more of Eric’s puzzles Here.