Doable 12 – Junichi Yananose

Wooooo boy. This week, I have Doable 12 created by Juno over at Pluredro. This is my Third puzzle from Pluredro and I anticipate that I will be ordering many more over the coming months and years.

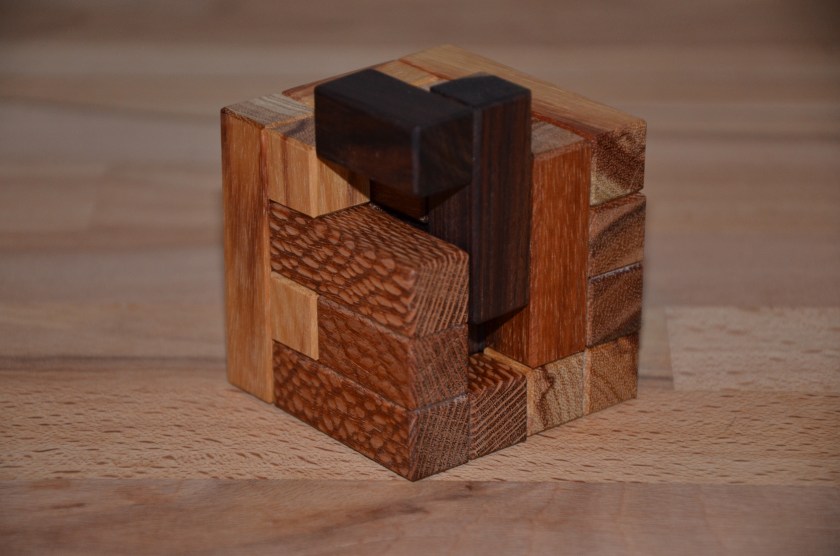
Doable 12 is a 12-piece burr that is labeled as “very difficult” – but as the name implies – “Doable” The 12 pieces are constructed of Juno-created plywood comprised of Black Walnut and European Beech. The plywood is then shaped with a CNC router. This results is a beautiful looking puzzle that is incredibly sturdy and pleasing to hold.

My first impression is that the puzzle is quite large. It easily fills two hands. It’s also easy to manipulate. The fitting of the puzzle is intentionally a little loose to prevent grabbing when you manipulate the pieces and I have to say, I think this was a wise choice. There is zero binding or other issues when playing with this puzzle where I think if the tolerances were tighter, it would be very difficult to manipulate.

12 separate pieces of Black Walnut and European Beech make up this wonderful puzzle.

Onward, we go past the descriptions and into the solving process.

This is a puzzle that wants to move! While some puzzles have a tricky opener, this one has multiple moves available straight out of the gate. In fact, I found myself quickly getting lost in the early stages of exploration. There were a few different paths I could go down and each path had further branches and all of them felt like they could keep going. So, for the first half hour, I would cautiously venture down a path and a branch until I was a few moves in and then would back out. I was trying to explore all the options to get my head wrapped around the possibilities.

Eventually, I found a move that seemed to significantly progress things. Once I had the puzzle in this new state, I had a few new options available and the puzzle began to significantly loosen up. I knew I was on the right track, but as things began to loosen up, I began to get nervous. What if I lost my place and couldn’t figure out how to get back to the start? Maybe I’m too conservative when solving puzzles, but I’ve been burned in the past by moving too quickly and then getting lost.

So, back and forth I went. I’d move 9-10 moves in and play around a little bit and then back out again. I’d set the puzzle down, then pick it up and once again progress 9-10 moves in, this time, I’d find an 11th move and then back out. This was my process, but the problem was, I had no idea how many moves it would take to release the first piece. Maybe I was only one move away? But maybe, I was 10 moves away. It felt close, but you never know, so I continued with this solving method.

And then, it happened. The first piece came out! Wow, I was so close for so long, but those nervous thoughts had me backing out over and over. Well, this time, I got it done. One piece removed. I wonder whether this is the beginning or the end…

Ok, well with one piece out, the puzzle is now very loose. I’m trying to delicately move the pieces around to see if anything else is ready to be removed and sure enough, another piece comes out with ease. It seems that the first piece was indeed the lynchpin – once removed, the rest come out with few or no additional moves.

The 12 pieces laid out in a dramatic light

Whew! So now I sit with a pile of pieces and a decision to make. I’m fairly certain that I could put the puzzle back together by retracing my steps (and utilizing a couple of photos I took with my cellphone) However, this puzzle is called doable for a reason. It’s supposed to be doable. That means, I should be able to get it back together without computer or camera aid. So, that’s what I’m going to attempt.

See, the 12 pieces are actually comprised of 6 pairs. The 6 pairs are joined by unique “puzzle-piece” type cuts that make them unique and thus finding the 6 pairs is easy enough. Had these pairs been joined with straight edge cuts, then there would be no possible way to tell what goes together (outside of tedious trial and error) So, at least I have that going for me. The next step is going to be to try to determine how these 6 joined pairs fit together. If I can figure that out, then all that remains is the sequence of events.

The 12 pieces arranged into 6 pairs. Without these unique joining-cuts this puzzle would be infinitely more difficult.

After another couple of hours of work, I’ve had some success and some failure. Through lots of trial and error, I eventually figured out the position of the 6 pairs. The hardest part for me was keeping track of what I had tried and what I hadn’t tried. And attempting to fit together these pieces without the puzzle exploding in my hands or knocking over was challenging. Many times, I’d feel like I was getting close to the solution only to have some pieces slip in my hands which would cause a catastrophic failure. I’d then have to spend a lot of time reconstructing the pieces back to where they were.

Eventually, though, I was sure that I had things correct. I could get 9-10 of the pieces together and could see that the remaining 2-3 pieces would surely fit. However, getting them in place was another story. I tried many times but ultimately failed to put this puzzle together from scratch and gave up.

Defeated in that endeavor, I pulled up some of the photos on my phone and used those as a reference. I eventually got the puzzle back together though the steps were a bit challenging. There are just so many interlocking pieces that it was a difficult to get everything sewn up just right. It almost felt like a coordinated motion puzzle for me in that I wish I had another hand or two to hold things steady. I would guess that if I knew the correct method that things would have done together better.

The completed puzzle. Back together, but not mastered… not yet.

In the end, this is a really fun puzzle. I feel slightly defeated because I didn’t get it together from scratch, but I feel like if I put in enough effort, I could have done it. This one will have to go in the “must revisit” pile for a rainy day.


YyYy – Osanori Yamamoto

YyYy – All right. Here we go. Time to go on a journey with YyYy designed by Osanori Yamamoto and brilliantly crafted by Jakub at Pelikan Puzzles. This one has me intrigued. I haven’t played with it hardly at all. I’ve spent maybe 2 minutes playing with this thing and in that 2 minutes, I was able to get the cube more scrambled than anticipated. The first little move took a few seconds, but then everything started moving and, oh my god, it was getting all mixed up and , holy crap, I have to pay attention and get it back to the start..

Well the time is right and I’m ready to focus my energy and really see what this here puzzle has got going for it. I’ve got some nice tunes on the turntable and a drink in my glass, the kids are asleep and I’ve got the evening ahead of me. I’m ready to get lost in this thing.

Oh man. 5 minutes in and i’m so confused and intrigued. I can’t quite figure out what the pieces are shaped like. They seem to hook on each other, but also slide into each other when positioned correctly. I’d also like to state for the record – this puzzle is gorgeous. It really is. Its got a good weight to it and somehow Pelikan puzzles are always so smooth. They are not only beautiful, but the pieces glide against each other and within the frame, and there is never a hint of binding. Ok, it’s calling me, so I gotta go back for more.

Well Damn. color me stumped. What seemed like a dangerous never-ending pit turned out to be only about 4 moves deep in 2 directions. Neither direction yielded any further development. What was initially scary unknown terrain soon became very familiar ruts from one dead end to another. There has to be another path hidden in the movements. I don’t know if I’ll find it tonight.

One of the dead ends that I discovered early on. There didn’t seem to be any possible moves from here.

And I didn’t. I was stumped and set the puzzle back on the shelf to try again another day. Several days went by and occasionally I’d pick the puzzle up and tinker with it, but I never got any further than the original dead end. I was practically carving grooves in the wood from tracing the same path over and over. There just didn’t seem to be any other options available.

Finally, one day, I had the puzzle in my lap and of course, like any other puzzle solving story, I tried a move that I hadn’t tried before(duh). And what do ya know? It worked. With just one additional little move that I hadn’t seen, I was now able to make a second move, and a third, and a forth and just like that, a piece was free. Wow, that was pretty cool. That hidden move was staring me in the face the whole time and I never tried it.

After the first piece is removed, the rest come out easily and the puzzle is solved. And I have to say, I’m amazed. I’m amazed because the puzzle is so simple. Holding the pieces in my hand reveals all the shapes and I really appreciate this puzzle because of its simplicity. The cage is completely straightforward, there are no hidden cubes or protrusions, its a simple, basic cage (albeit totally gorgeous). The pieces are also very straightforward, they do fit nicely together, but I’m just amazed that something made of such simple components can harbor such interesting moves.

Looks pretty simple, but the solution is mighty clever.

Overall, this puzzle is great. Its hard enough to call challenging and its pretty enough to call beautiful. I choose the Wenge/Ovangkol variant, and I absolutely love the tone and grain of the Ovangkol. I think it really pairs nicely with the Wenge burr pieces. As always, the craftsmanship is perfect. Everything sits perfectly flush and it is a delight to handle.

Well that wraps up another blog post and another completed puzzle. I’ve got a shelf full of unsolved puzzles and more arriving in the mail this week. Upcoming are new puzzles from Rombol, Pelikan and Pluredro, so please stay tuned and check back in. I’m working on adding a subscribe button to the blog, but in the meantime, you can stay up to date by following this page on facebook!

2 Rings – Chi-Ren Chen

2 Rings is a puzzle that was made by Eric Fuller and was sold back in October. The October batch of puzzles at cubicdissection was especially strong and it seems to me that this puzzle didn’t receive the attention it deserved. I wanted to make sure I got this writeup in before it got lost in the never-ending wave of new puzzles.

Straight out of the gate, this puzzle is stunning. The wood choices are spot on and the craftsmanship is truly impressive. Eric spliced in these strengthening corner pieces (sorry don’t know the technical term) that add great accents, but also create an extremely strong and rigid frame. This is important with this puzzle because it is very easy to accidentally generate a lot of leverage and force while manipulating the two pieces. I can imagine that this exact puzzle built with lesser standards might snap or break if someone torqued on it enough.

Wonderful construction. Beautiful. Strong. Functional.

Outside of the beautiful aesthetics, this is also a very fun puzzle to play with. I didn’t find it too difficult, but I really enjoyed that it stretched my thinking. There was something exciting about rotating the pieces in a 3 dimensional space and navigating this 3 dimensional maze. I also really like the fact that the puzzle has open sight lines. So many puzzles hide their movements inside a box, but here you can see everything and freely rotate the puzzle to view from all angles.

The puzzle arrived in a “incorrectly” completed state – that is, the two rings were together, but they were incorrectly oriented and the magnets were resisting each other. The first step was then to separate the rings. This was not too difficult of a challenge, but I wasn’t done yet. I still had to correctly assemble the rings. I made several attempts and several times found myself back at the beginning.

There is an obvious spot where the two rings can connect and disconnect. I found myself connecting them together, manipulating the rings through several moves and rotations to the point where I felt I was going to solve it – and then, suddenly, I’d be back at the connect/disconnect spot. Hmm. How frustrating!

After a few more attempts, I finally found my way to the end of the puzzle and that satisfying “snap” as the magnets came together. I would guess that there are a few separate solutions for this puzzle, and I’m not sure of the exact moves I used. I just kept moving forward and eventually found the solution.

As a kid, I always loved mazes and this puzzle brought me back to those roots. The two pieces have to be manipulated correctly through a sort of 3d maze. Since the magnets are visible, it is fairly obvious what the completed state will look like, so the difficulty lies in the journey to the completed state, which, in my mind, was very similar to solving a maze. Manipulate the pieces until a dead end is reached – backtrack to the previous junction, try the other path and continue on and on until the end.

Fun movements as the two rings rotate and interact with each other

Solving this puzzle is great – the two rings really “snap” together as the high strength magnets find each other. The magnets also make the first move very tricky to find when disassembling the puzzle. I’ve had this one sitting on the shelf for a few weeks and each time I pick it up, it takes me a few minutes to find the first move. It takes some real force in one specific direction to break them free.

To me this puzzle acts as a proof of concept. I think it is a clever idea with unique manipulations, but I also think that the idea could evolve into something even better. I’d love to see what “3 rings” would look like, or what if the voxels were smaller, or what if the faces were curved to invite unique rotations? I really think there could be many future possibilities using this same concept of open, interlocked rings.

The two rings – separated. Magnets are visible on the exposed ends

Inelegant Cube – Haym Hirsh

Today, I have the Inelegant Cube designed by Haym Hirsh and beautifully crafted by Brian Menold at Woodwondersonline. This particular version of the puzzle was crafted using Red Louro, Yellowheart and Wenge pieces. It was $5 more than the other version, but I thought the extra pop from the yellowheart was really worth it. Once assembled, this puzzle displays beautifully on the shelf thanks to the included stand. The stand was also very helpful in the assembly process.

The puzzle is comprised of 9 “L shaped” pieces which are each made from 3 identically shaped blocks. However, those 3 blocks are glued together in many different configurations so each of the 9 pieces is unique.

All you have to do is combine these 9 pieces into a cube. Not an easy task.

This was a very challenging puzzle for me. I haven’t worked on a puzzle like this before, so I didn’t have much strategy going into it. A typical session would involve me randomly placing pieces onto the stand in hopes that I would magically arrive at the solution. This strategy didn’t work well and I would often give up after only a few minutes of effort. I didn’t seem to be making any progress and furthermore, I wasn’t eliminating any possibilities either.

At one point, while I was working on a solution, I put two pieces together and they just seemed correct. Finally, I had something to work with and had a tiny bit of hope. This hope soon fizzled out when I fumbled the puzzle and lost track of those two pieces that seemed to fit together so well. Once again, I gave up and shelved the puzzle.

I then decided to bring the puzzle to work and in between work tasks, I was able to spend a bit of time working on things. After what seemed like an eternity, I slowly started to work out a strategy.

There were a few key factors that started to help me push towards a solution. The first was that all the sides had to be level. This seems obvious now, but for some reason it took me a while to realize this. Accordingly, if the sides had to be level, then any configuration where sides aren’t level can be thrown out. The second factor is that the wood types do not have to alternate. For a long time I assumed that two pieces of the same wood type couldn’t sit next to each other, but eventually I determined that this was false. The third factor was using the base as a guide to how much overhang the pieces required. The puzzle doesn’t fit perfectly on the base, rather it has a slight overhang, thus if any configurations produced a larger or smaller overhang, I knew they were not correct.

A nearly completed cube. By keeping the sides level or flush with each other, I was able to build the solution through trial and error.

Armed with these realizations, I began a more methodical process of trial and error. I soon had one side of the cube completed in what I thought was the correct configuration. With one side complete, it was just a matter of time to correctly place the remaining blocks. However, as it turns out, I did not have the first side correct and so my trial and error process eventually ended with no solution and no remaining combinations to try. Failure again!

Back to the drawing board I went. I re-examined my “correct side” and discovered that there were a couple of pieces that I could swap out which then led to additional combinations to attempt.

Finally, after many days of work, I slid that last piece in and the puzzle was correctly assembled. Wow. What a fun puzzle to complete!

It’s so satisfying to finally solve this puzzle!

This puzzle was a major challenge for me. I didn’t have much experience to draw from and thus didn’t have much of a strategy to start. I felt rather helpless in my first handful of attempts and it wasn’t until those first 2 pieces fit together that I felt a glimmer of hope. In the end, it was the process of elimination that allowed me to find the solution.

I really enjoyed this puzzle and despite its’ name, I found it to be quite elegant.

Six Face – Andrew Crowell

This week, I have Six Face – designed by Andrew Crowell and crafted by Brian Menold over at Wood Wonders. I’m very happy to have picked this up as it looks very similar to Six Rings, which was awesome, so I’m hoping this one is just as fun.

First off, this puzzle is an absolute beauty. There were 3 different wood combinations available when these were first listed and I quickly ordered the East Indian Rosewood, Ebarria and Koa variety and I am more than pleased with how it looks in person. Not only does this puzzle look great, but the fit and finish are spot on and it is a joy to manipulate.

The initial move is well hidden and it takes a lot of experimental pushing and pulling on various pieces to find it. When I finally found it, I was a bit shocked. 3 little moves and a big ole chunk of the puzzle comes right out! Usually, there is a lot more manipulating necessary to release that first piece, but not with this design.

The first big chunk has been removed. It gets harder from here.

Also interesting is the fact that soon after that first chunk is removed, I have 3 separate smaller pieces to manipulate. They are seemingly trapped as I can’t remove them, but they do have some limited movement, back and forth, up and down. I play with these movements for a while and soon realize that there must be more going on. So, I try a couple of new things and discover that 2 of these pieces can sort of do-si-so around each other which allows the 3rd piece to move to a new location. All this then allows a big chunk to slide up and one of the smaller pieces can then be removed.

About to remove the first small piece

Its quite a sequence to get this far and these are very cool and clever movements that feel unique and exciting. I’m not sure how Andrew does it, but all his puzzles seem to have this same quality to them.

The next set of moves took me a while to figure out. There are now 2 “free” smaller pieces that can move within the puzzle and there’s the bigger chunk that can still move up and down, but for the life of me, I couldn’t figure out how to unlock any of them. I discovered that one of the pieces could be rotated, but that didn’t seem to help much. Eventually, I had my epiphany and figured out a delightful sequence of 8 moves with one rotation that allowed one of the smaller pieces to be removed. Once again these clever movements had me smiling to myself in astonishment!

With only 3 pieces left it should have been easy at this point, but I was overthinking things and struggled for a bit to remove that final tiny piece. It was actually a lot more straightforward than I was making it out to be and once I took a closer look at the puzzle, I was able to pull that final tiny piece out.

At this point all that was left was two intertwined “bigger” chunks and they come apart easily – though it does involve another rotation and is wonderfully marvelous how they fit together.

All the pieces have been disassembled. Beautiful wood and an excellent design.

This puzzle has the same joy of discovery as 6 rings did. There’s something magical about holding a puzzle for the first time – knowing that it can be unlocked with knowledge – and knowing that with enough persistence, I can gain that knowledge. For me it’s like holding an unread book. There is excitement and anticipation and a crackling of energy in the air and this puzzle did not disapoint.

Some puzzles excite me and some feel tedious. I suppose I like Andrew’s puzzles because I can solve them, yet they provide a good amount of challenge. They are never frustrating and when I finally figure out the moves, I greatly enjoy basking in the dreamy glow of accomplishment. Overall, a great design, fantastic craftsmanship and joyous moves make this one of my favorites.

giganTIC – Andrew Crowell

Today, I visit giganTIC designed by Andrew Crowell and wonderfully crafted by Brian Manold over at Wood Wonders Online. I have bought a number of puzzles from Brian recently, but most of them remain unsolved including Perfect 11, I&i, Jitter Soma and Inelegant Cube. Hopefully, I’ll have time in the next few weeks to get to those. But, in the meantime, I have spent the last couple of nights getting to know giganTIC.

The beautifully crafted giganTIC puzzle designed by Andrew Crowell

This is a fantastic puzzle. Despite it’s name, its a little smaller than a typical 4×4 cube. But perhaps it’s the number of moves required that encouraged its name. At 10.10, this is a moderately difficult puzzle that is extremely fun to explore and understand.

The puzzle itself is incredibly beautiful. The selection of exotic woods really makes this one special. I have spent a lot of time holding the individual pieces are marveling at the wood grains. Two pieces in particular are especially nice – the lacewood section with its very conspicuous flecking and the dark brown wood that contains streaks of light brown (sorry don’t know the name of this wood!).

Solving this puzzle is a joy. As with most of these Crowell design TICs, the first move is fairly well hidden and requires pushing and pulling pieces as you spin the cube around. Eventually, the first move is found and soon thereafter is the first rotation. There are a couple of dead ends possibilities, but the path to the solution is mostly straightforward.

The first piece has moved which starts to unlock the mysteries contained within.

I spent bit of time wandering in circles somewhere around the 7-8th move. I couldn’t quite figure out what was next. It was then that I re-read the description and saw that this was a 10.10 solution puzzle. This narrowed down my options as I knew that the 10th move had to remove a piece.

On a side note – I wonder if puzzles descriptions should include the number of moves required to solve it. Isn’t it a bit of a spoiler to know ahead of time how many moves are required? I often use this information as another clue to help me solve the puzzle, but I wonder if I am robing myself of some of experience by utilizing this knowledge? If I didn’t know that this was a 10.10 puzzle, how would that have changed the experience?

The first piece has been removed from the puzzle, only 10 more moves to go!

Anyway, back to the puzzle – After the first pieces is removed, I was again stuck. I continued to cycle through all the known moves – I would return the puzzle back to the start – minus the one piece, and then would work forward again to the spot where I removed the piece and would hit the dead end. There didn’t seem to be any other options. But then, like any decent puzzler, I forced myself to try other options and soon enough found a new path forward.

The new path quickly revealed the answer and with a final rotation, the puzzle separated into two halves. Wow, this thing is really cool!

Puzzle has been disassembled! The wood used in this puzzle is just beautiful.

Overall, The puzzle is kind of split into two separate sets of movement. The first 10 moves remove a cornerstone piece and then the next 10 moves separates the puzzle into two halves and the rest is trivial from there. The moves are really quite unique though, with a number or rotations mixed in as well as other hidden moves that are exciting to find.

It’s hard to imagine that so many mysteries could be hidden in 64 voxel cube. It seems like there should be a finite amount of interesting puzzling options – and I’m sure there are, but to my mind, there are many more options than would seem possible. Andrew seems to have a knack for designing these really creative puzzles that are full of unique and interesting moves. Each step along the way is delightful and satisfying and I can’t wait for more.


Wing Hangar – Osanori Yamamoto

Today, I have the fabulous “Wing Hangar” from Osanori Yamamoto. This is another piece produced recently by Jakub over at Pelikan Puzzles. It’s a wonderful puzzle with only 3 pieces, but don’t be deceived, it’s a bit tricky. As with all Pelikan puzzles, this piece is a work of art and it is a joy to play with.

The puzzle consists of Mahogany outer box and two (in my case) Wenge Burr pieces, But Tthe puzzle also came in a Mahogany/Purpleheart variation. I’m a sucker for Wenge, and thus am very happy with the variant that I chose.

My thoughts while initially playing with the puzzler were as follows: 

“Ok, so I’ve been playing with this puzzle for about an hour and I haven’t gotten anywhere. I thought this one was going to be easy. There’s only 2 pieces, there can’t possibly be that many options, yet here I sit, unable to get the 2 pieces into the box.”

Burr piece slots nicely into the roof of the box but there just isn’t enough room!

This puzzle gave me some trouble to begin with.

“I think they made a good call sending this one out unassembled – it is proving to be a good challenge. The difficulty lies in not knowing the orientation of the pieces – and the pictures on the Pelikan website don’t help.  If I don’t have the orientation correct, then I’m spending time working on an impossible solution. Up to this point I haven’t gotten systematic with it yet either.”

This puzzle took me an embarrassingly long amount of time to put together. I didn’t clock it, but I definitely worked on this for numerous hours over numerous days. And once I solved it, I put it on the shelf and moved on to another. It was many days later that I finally returned to Wing Hangar.

When I finally did return, I found that now, I couldn’t disassemble it. What the heck? I had put it together, surely I could now remove the pieces. I tried over and over and just when I thought I was making progress, I’d realize that I just completed a loop and was back where I started. Frustrated, I put the puzzle back on the shelf for another day.

Today, I had a little time and a little more focus and decided once and for all to conquer this puzzle. And sure enough, not 20 minutes later, I had the pieces out and not only that, I had an understanding of how it works. I took some pictures and then was able to quickly assemble the puzzle again. Now I’m left wondering why the heck this one took me so long to solve and understand.

The pieces are out! This is how this puzzle is shipped.

It’s interesting to me because I’ve experienced varying degrees of success when solving puzzles and I largely attribute my performance to my mental state at the time. Sometimes, I’m just in the zone and all my focus is on the puzzle and I seem to do well in those moments, but other times, I just can’t seem to get anywhere. Clearly I need time and space to perform my best because if there are distractions, or a looming obligation, then I don’t seem to have the required focus.

Also, solving puzzles can be mentally exhausting and I don’t always feel like putting myself through the mental anguish. A lot of nights, I do have the time, but I don’t have the focus. Either way, I’m going to continue to solve puzzles when “the time is right” and try not to force anything. I don’t want this hobby to become a job.

TRIAD – Osanori Yamamoto

This week, I have Triad, designed by Osanori Yamamoto and built by Jakub Dvorak of Pelikan Puzzles. I purchased all the recent Pelikan puzzles – minus Excalibur – and will be writing my thoughts on all of them over the next couple of months.

This was the first of six puzzles that I opened and immediately I am made aware of how beautiful Pelikan Puzzles are. They are so well made, the tolerances are so small and the wood choices are impeccable. The difference between these and other puzzles is immediate. These puzzles are absolute works of art.

This particular puzzle contains 3 burr-type pieces enclosed in an open framed box. The pieces appear to be identical in shape, though Jakub has wisely chosen 3 different types of wood. This puzzle is smaller than the others, but that’s ok because I’m running out of room on my puzzle shelf!

It’s beautiful and amazingly precise

This puzzle seems fairly straightforward. The three pieces can each slide independently of each other and there are no internal stoppers or notches in the framed box. It seems that it is just a matter of finding the proper sequence to remove the first piece. I would expect that the second and third piece fall out once the first is gone.

After playing around with this thing for a few minutes, I have a couple of observations. First, the pieces are not identical, there is a definite difference – though they all seem to share a similar forked end, there are seemingly some variations between the pieces. The second thing I noticed, is that this puzzle is a little trickier than I had initially thought.

The pieces move in and out and conveniently shift to make room

After about 20 more minutes of work, I have the puzzle disassembled. The moves are not too difficult to figure out and I don’t remember any dead ends, so it seems like a fairly linear path to resolution. Despite my initial prediction, once I had the first piece out, the remaining two pieces DID NOT just fall out. In fact, the final two pieces were pretty tricky. I had several “incredulous head shakes” at my own expense while trying to remove those final 2 pieces. There is definitely a particular sequence, even though it feels like it should be easy.

The pieces have been removed, now time to assemble

I’m a bit nervous about re-assembly though – I’ve made the decision to scramble the pieces and not reference any photos to attempt the re-assembly – wish me luck..

But before I re-assemble. Let me take a moment to once again point out how beautiful and well-made these puzzles are. I’ve examined the pieces thoroughly and am truly impressed by the workmanship. Everything is just perfect and precise. In fact, I’m out of adjectives to describe it. There’s just something incredibly satisfying about holding perfectly accurate wood structures…. Ok. back to it..

Well assembly is not easy. I’m still working on it, but I’ve noticed something very obvious that I had overlooked… The framed box isn’t square. Yeah, I know, super obvious, but for some reason, it didn’t really register. But since the 3 internal pieces are not all the same length, it is now clear which pieces are horizontal pieces and which one goes in a vertical orientation…

Yes! I’ve re-assembled the puzzle and it was super fun. This is a great little puzzle. It’s one of those puzzles with a perfect balance of difficulty and intrigue. It seems almost impossible at times, but there are enough clues available to sort of funnel you into the correct solution. Since the box is open, you can see inside and see all the movements. Thus, using a little logic, you can determine what pieces need to go where – they simply wouldn’t fit in a different orientation. So, armed with a little knowledge and determination, I think this puzzle is very doable for even a novice puzzler.

Solved puzzle was fun, picture is a little crooked.

Theres one or two clever little moves that allow this puzzle to work and I’m excited to run through this one a few times to see if I can really master what is happening. 

The other thing to mention is that this puzzle requires zero rotations. There were a few times where the pieces “wanted” to rotate and I thought that maybe I could remove one with rotations, but I resisted the urge and you should too. Thanks to the incredibly precise nature of this puzzle, it was obvious that rotations were not correct, but if this puzzle were looser – it would be easy to accidentally rotate a piece.

Buy your copy here

Sequential Discovery Burred Box – Junichi Yananose

Oh man, I’m so excited. I just received a package in the mail from Pluredro.com and I am now the proud owner of the Sequential Discovery Burred Box! This particular box was announced on social media (as far as I know) and sold out super quick (In 5 days!). I was on vacation at the time, but managed to sneak an order in when inventory was down to only 3 or 4. Well, I’m glad I put in the order, because this puzzle sure looks like fun.

A Quick Warning! – I’ve tried hard not to include any spoilers in my write-up, BUT, if you own this puzzle and haven’t yet solved it, I would avoid reading any further. You have been warned!

The only spoiler-free image I can show! Many secrets hidden inside this puzzle.

I’m going to do a running commentary for this blog post – I’ll write down my thoughts as they come and try to share in the discovery of solving this puzzle (hopefully!) I want to be careful not to post any spoilers, but also want to share the process – the successes, the failures, the frustrations and ultimately, the triumph! Let’s get started.

This puzzle is super unique. It is a sequential puzzle, that also has a small cavity inside. Is it a puzzle box? Is it a burr? Is it sequential? Yes, yes and yes!

My initial impression is that it is pretty big. It is bigger than my hand, and yet despite that, it is surprisingly light. It is hard to believe that there is a sequential puzzle box incorporated into this common 6-burr shape – but we shall see.

My initial inspection doesn’t reveal much. There are no loose pieces rattling around inside and there is not obvious initial move. It feels solid with very little play between the burr pieces. Closer inspection reveals that there aren’t 6 separate burr pieces either – some of them are fused together or made from a single piece of wood. Ok, enough of the examining, its time to start working on it and see what happens!

Wow! Very quickly, I’ve made my first discovery – and it is pretty exciting. That quick rush of adrenaline that spiked up and down my spine is exactly why I love puzzles. Without revealing any spoilers, I can say that this first discovery has revealed some of the puzzle’s interior and also given me access to a “tool” of sorts. I’ll see if I can put that to use…

But before I use the “tool” I’ve discovered that there are now some movements possible that weren’t possible before. And it’s even more exciting because this new movement now opens up some more areas and also unlocks an additional piece. This is really cool stuff and despite my skepticism this puzzle does indeed hide more secrets than seemed possible.

I’ve managed to use the tool and one of the pieces to make another move and now I am stuck. Is the puzzle solved or is there more to it? I fiddle some more and am feeling pretty certain that there is more to do here. There is still another area that I haven’t touched and then I discover there is also another tool to use! I can use the first tool to free the second! I’m having so much fun here!

There aren’t a lot of options left at this point but I still have to try out a couple of alternatives to see what works. Finally, I notice an area that I had not yet utilized and it just so happened to be the exact size to fit one of the other pieces… But I didn’t have things oriented correctly, so had to give it a second try and YES! I’ve done it! One last little trick and I’ve discovered the small cavity and the “Juno” brand! Wow. That was so cool!

One more shot of puzzle. Very clever indeed.

I’m just amazed at how much was packed into this puzzle. True, it’s not a small puzzle, but my first impression was that it would be pretty simple, and in fact it turned out to have many more moves and sequences than I thought it would have. Lesson learned – don’t judge a puzzle my its’ weight!

Overall, this puzzle was delightful. I really, really enjoyed it and hope that Juno makes many more of these types of puzzles – in fact, I may have to purchase one of his puzzle boxes because I enjoyed this so much. While this particular puzzle is no longer available,  its popularity and quick-selling performance makes me confident that there will be more of this type coming in the next year – and I can’t wait!

Okto Cube – Yavuz Demirhan

Today, we have another beauty from Eric over at Cubicdissection.com. This one is called Okto Cube and was designed by Yavuz Demirhan. This particular puzzle immediately caught my eye when it was listed, and I was very excited to work on it. I love the looks of it and it was equally fun to manipulate and discover it’s secrets.

This is a six piece board burr encased in an eight piece cube. The cube pieces are made out of solid wood which gives this puzzle an overall weight that is pleasing and the boards are well made and strong.

Solving this puzzle took a while. I brought it with me on Thanksgiving vacation, hoping that I would have some quiet evenings to work on it. Well, I didn’t have many quiet evenings, but I did get to work on it extensively, which was great.

I had played with this puzzle a handful of times before I made any real progress. I could move a few of the burr pieces, but always hit the same dead end. Eventually, I discovered that it wasn’t a dead end after all. Once in the “dead end” position, I found that the signed burr piece could move freely. I had missed this move because its quite easy for the pieces to bind up a little. I often had to pull on board pieces to make sure they were fully extended before manipulating the next piece. It seems to loosen up after a bit of use, but is something to watch out for.

Once, the signed burr piece moved, I was then able to remove 2 of the cube pieces, which was a very cool (and scary) moment. I was expecting the puzzle to fall apart at this point, but that wasn’t the case at all, in fact, I had a long way to go.

The Signed board makes an appearance and one cube is removed.

Removing the 2 cube pieces revealed more of the interior and allowed me to see just how complex this puzzle is. There sure are lots of moving parts! I continued to manipulate the puzzle and was able to remove the first board piece. Soon after, I found that 2 more cubes were ready to fall off. Awesome! This thing is really fun.

4 cubes and a board removed. This puzzle is fun!

I continued to manipulate the parts feeling certain that I was close to the end. But no.. the puzzle still held secrets for me to unravel. I persevered and after a bit more manipulation and I removed 2 more cubes! I was now down to the final 2 cubes!

This is where things got really interesting for me. I was working on the puzzle in front of the tv, sitting with family, and I just didn’t have the focus I needed. I began to worry that I wouldn’t be able to get it back together again! I was hoping that the final 2 cubes would come off easily, but that wasn’t the case. I was having to do more movements than I could keep track of and I made the decision to stop and reassemble. Bah! I always seem to do this. Luckily, I was able to get the puzzle back together, but I was a bit ashamed that I didn’t finish it.

I ended my vacation and flew home defeated. I had come so close to the solution, but didn’t quite get there. 

Well, last night, I sat down, determined to redeem myself and finally solve this puzzle. I progressed through all the stages and once again found myself with the final 2 cube pieces attached to 4 burrs. I slowed myself down and analyzed the situation. There were a surprising amount of available moves and positions that I could find and eventually, I tried a combination of positions not previously attempted and voila! The 2 remaining cubes slid right off! Disassembling the final 4 burr pieces was not trivial either, but I got it done.

Okto Cube Disassembled

Whew! That was an awesome puzzle! 

But.. it wasn’t over yet. I still had to assemble the puzzle. Interestingly, I didn’t have much trouble on the assembly. I think that my aborted attempt during thanksgiving vacation had given me a better understanding of the moves required, and so assembly felt rather easy. I think the most difficult part was getting it started. For some reason, I seem to have trouble assembling the initial 4 burr pieces. But once that is complete and I had slid on the first two cubes, it was all downhill from there. 

I’ve since solved this puzzle a couple of times. I had to take some pictures and also wanted to better understand the mechanics behind it all. It is truly a remarkable puzzle and it is very repeatable once you understand the required positions. This is now one of my favorite puzzles! Check it out if you can!

Okto Cube looking all dramatic in the light

— SPOILERS BELOW. —